Small rocks are usually used to create various crafts:
- Adhesive
- Sandpaper
There isn’t just one type of adhesive you can use to glue small rocks together, such as pebble rocks.
The most common adhesives used for this project usually are:
- Super glue
- Liquid epoxy glue
- Jewelry glue
To glue small rocks together efficiently and durably, there are a few steps to take outside the gluing.
Keep reading to discover how you can glue small rocks that will hold with time.
Glue For Crafts
The usual procedure for someone starting a job like this is to clean the rocks, apply the glue, and be prepared. Here’s how to glue the tiny rocks together such that the bond is as strong as is capable of being and that the joint is as durable as possible.
Phase One: Prepare the rocks
Use a clean cloth and warm, soapy water to thoroughly clean the rocks if they are covered with dirt or other stains. Dry them with a clean cloth or let them air dry.
Now follow these steps:
- Choose which side of the rocks will be glued together
- Use fine-grit sandpaper to sand those sides to create a better adhesion
- Use clean soapy water or isopropyl alcohol to clean the rocks
- Let them air dry, or use a dry clean towel to dry them
Here are a few of our recommendations before you move on to the next step.
When working with glue, we recommend the following:
- Use protective gloves to protect your skin – if you have gloves on and glue accidentally spills on your hands, it won’t come in direct contact with your skin
- Work in a well-ventilated area to avoid breathing in fumes the adhesive may release into the air
If you don’t have the option of working outdoors, then improve air circulation and ventilation in your workspace
You can do this by:
- Using a fan
- Opening up windows or the door
- Protect the surface you are working on
If you don’t have a designated work surface that you don’t mind getting stains on, that’s okay; just cover the space you are using to glue your rocks together
You can use:
- Cardboard
- Plastic or old tablecloth
- Newspapers
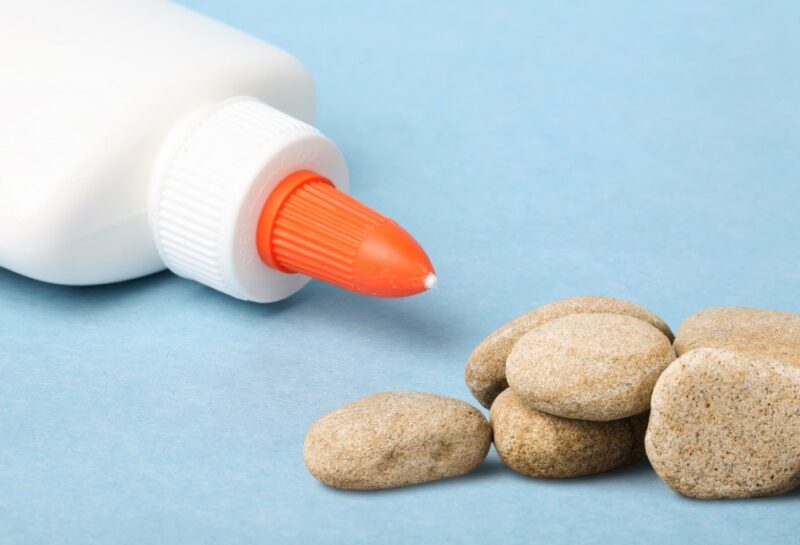
Phase Two: Apply the glue
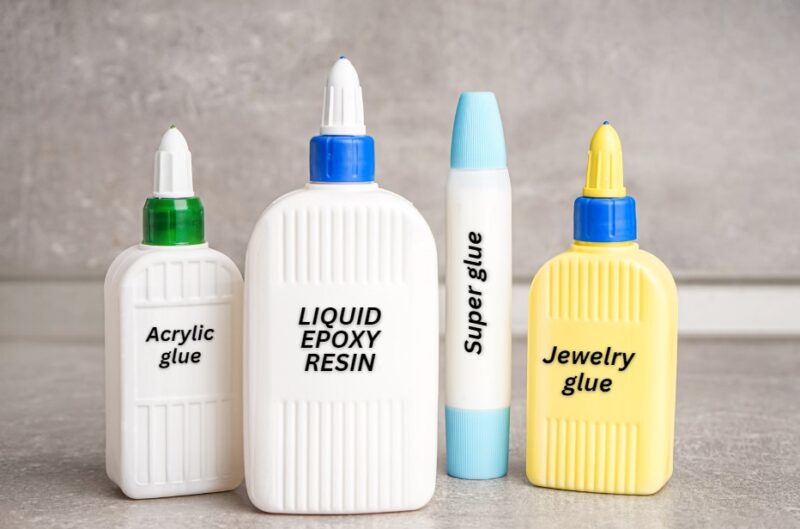
The exciting part is about to start. However, you must first select the adhesive you’ll use before you can bond your tiny rocks together. So let’s quickly review the glues that are frequently utilized for this endeavor.
1. Super glue
-
- Great for small rocks
- Dries quickly
- Choose a 100% waterproof variation
2. Jewelry glue
-
- Dries clear
- Not recommended if your rocks will be in contact with water
3. Liquid epoxy resin
-
- The strong bond it creates is ideal for medium to large rocks
- Great for rocks that don’t fit perfectly together
- Holds up in temperature changes, even to some extremities
4. Acrylic glue
-
- It offers a strong bond for rocks, but its texture becomes dense and may also expand a bit – this means that the glue may be noticeable between the rocks after the glue dries and cures.
Choose the adhesive you’ll use for this project from liquid epoxy glue, jewelry, or super . It doesn’t really matter.
To glue small rocks together, follow these steps:
- Once the surfaces of the rocks are cleaned and fully dry, apply a thin layer of the glue on the surface of the rock (or a small blob in the middle of the surface that will be glued)
- Along the rocks and press them together
- Use your hands to keep applying the pressure until dries (for super, it is usually 30 seconds, for jewelry, about 10 minutes, for epoxy, it could be a few hours)
The most popular adhesive for these kinds of crafts is epoxy glue. Don’t mix epoxy in advance; these adhesives typically come in two components that must be mixed together before being applied to the surface.
If you want to work with liquid epoxy glue, follow these steps:
- Use a disposable cup and a wooden stick to mix the epoxy
- Mix well until the adhesive is consistent
- Use a cotton swab or a clean brush to apply and spread the to the surface of the rock
Phase Three: Allow the glue to dry and cure fully
The waiting phase will now begin. In order to achieve the greatest results, it is necessary to fully cure the adhesive before moving or working on your project. In general, adhesives need 24 hours to cure, although some, like certain epoxy adhesives, may require up to 48 or 72 hours.
Read the manufacturer’s instructions to learn the precise times. Don’t worry; holding the rocks together for this long won’t require you to use your hands. But maintaining them in place is crucial if you want to create a solid and long-lasting link.
While it cures, you can hold the rocks together using masking tape or clamps.
How To Glue Rocks Together For Landscape
There are various factors to take into account while gluing rocks together for a landscape, such as:
- The size and weight of the rocks
- The weather and temperature conditions the rocks will be in
- Will the rocks be in direct contact with water?
The kind of glue you need to use for this project will depend on these variables.
Regardless of what you are dealing with, construction adhesive is typically the preferred adhesive to join larger boulders in a landscape:
- Decorative landscaping rocks
- Gravel
- Bounders
If you are looking to glue rocks together for landscape, these are the steps you need to follow.
1. Step One: Prepare the rocks
- You must clean these larger rocks much like the little ones you use for crafts.
- To simply remove any dirt or debris off the rocks, use a brush. If the rocks are dusty, you can clean them with a fresh towel.
- To properly rinse them off, use your hose.
- Use buckets to pour copious amounts of water over the rocks if you don’t have a garden hose, or you could even dip a clean towel in water and wipe the rocks with your hands.
- Wait until the rocks have completely dried.
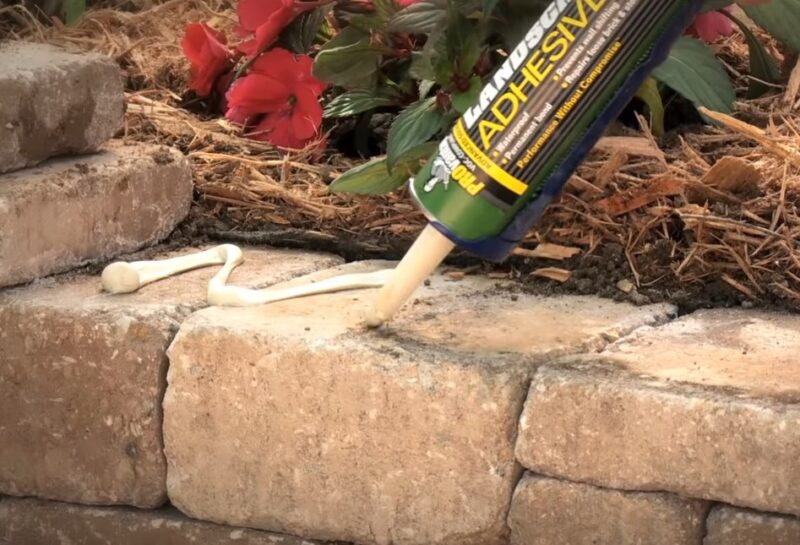
2. Step Two: Apply the glue
- Apply the glue to the rock’s surface using a caulking gun. This will not only simplify the application but also provide you greater control and precision.
- To create the finest bond possible, pick a construction adhesive designed specifically for masonry applications.
Now follow these steps:
- Use the caulking gun to apply a couple of thick beads of construction glue to the surface of the rock
- Go back and forth with it across the surface of the rock
- Align the second rock surface to the one you applied the glue to
- Press them together and secure them in place
- Keep pressing the rocks together, securing them in place for a minimum of 1-3 minutes
- Use tape or ropes to keep the rocks secured in place until the adhesive fully dries and cures
Even after fully curing, construction adhesive is simple to use and still has some flexibility. To find out exactly how long you must wait for the glue to thoroughly dry and cure, see the manufacturer’s instructions. You can glue rocks together for a landscape using this method if you prefer to work with cement.
The one drawback to using mortar is that, once it dries, you can typically see it between the rock surfaces. If this doesn’t concern you, however, then follow these instructions to use mortar to join your larger rocks:
- Follow the same preparation steps as above, except, after you rinse the rocks with water, don’t fully dry them
- To glue these rocks together with mortar, you need both of them to be still damp when you apply the mortar
- You should mix the mortar well together until you get a paste that isn’t liquid-like but also isn’t too hard
- Use a trowel to apply the mortar to the stone (about 1-inch thickness)
- Attach the second stone on top of the mortar; you can wiggle it in place
- Use rope, tape, or even wire to secure them in place
- Wait for the mortar to dry and cure fully
Frequently Asked Questions
What glue is best for rocks together for a waterfall or a pond liner?
d
For gluing rocks together for a waterfall or a pond liner, it’s recommended to use a two-part epoxy glue. This type of glue is designed to be water-resistant and can hold up well under the constant exposure to water. It’s important to choose an epoxy glue that is specifically labeled for outdoor use and can withstand the elements. When applying the glue, it’s important to clean and dry the rocks thoroughly beforehand to ensure a strong bond.
Can I use any type to glue rocks together?
No, not all types of glue are suitable for gluing rocks together. It’s important to use an adhesive that can withstand the weight of the rocks and exposure to weather conditions. Super , liquid epoxy , and jewelry glue are commonly used for gluing small rocks together, while construction adhesive is recommended for larger rocks used in landscaping.
How long does the glue take to dry?
The drying time depends on the type of adhesive you’re using. Super glue usually dries within 30 seconds, while jewelry may take around 10 minutes. Liquid epoxy may take a few hours to fully cure. Construction adhesive may take anywhere from 24 to 72 hours to dry and cure completely. It’s important to follow the manufacturer’s instructions for the specific glue you’re using.
Can I glue rocks that will be in contact with water?
Yes, some types are waterproof and suitable for rocks that will be in contact with water. Super glue can be used for this purpose, but it’s important to choose a 100% waterproof variation. Liquid epoxy and construction adhesive are also waterproof and suitable for rocks in water features or landscaping near bodies of water.
Can I use glue to create a rock sculpture?
Yes, glue can be used to create a rock sculpture by gluing the rocks together in the desired shape. Liquid epoxy or construction adhesive are recommended for this purpose, as they provide a strong bond for larger rocks.
How do I remove excess glue from the rocks?
If there is excess glue on the surface of the rocks after gluing them together, it can be removed using a razor blade or sandpaper. Be careful not to scratch the surface of the rocks while removing the excess. It’s also important to allow to fully dry and cure before attempting to remove any excess.
Conclusion
Gluing small rocks or large boulders together can be a fun and creative way to make unique crafts or create a stunning landscape feature. Choosing the right adhesive for the job is crucial for ensuring durability and strength.
By properly preparing the rocks, using the appropriate adhesive, and allowing sufficient time for curing, you can achieve a long-lasting bond. However, it is essential to follow safety precautions when working with adhesives and ensure proper ventilation in your workspace. With the right tools and knowledge, gluing rocks together can be a rewarding and enjoyable experience.